You need
- An USB-UART Adapter. This device maps a serial (UART) connection across USB to a serial port (COMx on Windows). Device drivers are required.
- A terminal program, which can handle serial ports.
The hardware
There are various types of USB-UART adapters on the market (eBay or AliExpress). First I tried this type:

Those are garbage. They contain an illegal copy of a Prolific PL2303 Revision A chip, which is discontinued since 2012. Read HERE. The problem is that the latest Windows 8 & 10 driver won't work with it anymore. Some articles in the net say that Prolific has changed the device signature in their later revisions to lock out the copies. You need to install an older version of the driver. I wasted way too much time with this rubbish.
I opened mine up and the chip had no marking on it. Sure sign of a copy. Also, the USB plug already started to come off the board.
So I tried another one with the Silicon Laboratories CP2104 chip:

This one's legit. No driver problems, Windows found the driver itself and the device worked.
The software
On the PC you can use PuTTY. A more sophisticated program is RealTerm. It can record sessions, which is quite useful, and has more features than you'll ever need. Both are free.
The Android app Serial USB Terminal by Kai Morich also works fine. You can read the log on your tablet or phone quickly without a bulky laptop. Just put a micro USB adapter in front of the UART device.
The connection
Now this kept me busy for a while due to my own incompetence.
The UART / service socket on the TVs is a stereo 3.5inch type like for headphones. The connections are as follows:
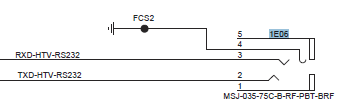
Here is the rub: you need to cross RXD and TXD. Don't connect the RXD on the adapter with the RXD on the TV. Makes total sense once you understand it :-)
A schematic from a ComPair device manual put me on track:

And that's how I built the thing. I attached a 3.5 inch stereo socket to the adapter and used a stereo cable I had lying around:

First tests
I had a working 42PFL9803 sitting in my living room and I tested the device with it. To my surprise I could not get any useful log. The service manual says 38400bps 8N1. I configured everything accordingly and all I got was garbage. The TV sent data but it wasn't readable. I tried many bps setting with no luck. This TV fooled me for quite some time. I thought something was wrong with the UART adapter :-/ I think the older boards use a lower UART voltage level and won't work with this adapter.
Yesterday, I picked up a 32PFL9606 and with this one it worked flawlessly.


Sweet! I can add one more diagnostic tool to my repertoire. I currently have a 46PFL8007 with the dreaded QFU chassis, which doesn't show any signs of life even though the standby voltage is good. It's not writing a log either. But that's the subject of an upcoming blog post once I have reprogrammed its boot EEPROM, which I suspect.
In the meantime, I glued it into a nice blue box:


